Many smart home enthusiasts want to control older infrared (IR) appliances like air conditioners or TVs without relying on cloud services that can be slow, unreliable, or invasive. The open-source project IR2MQTT offers a refreshing cloudless alternative built around Home Assistant, ESP32/ESP8266 boards, and a user-friendly web interface. This Q&A covers everything you need to know to set up and use IR2MQTT, from hardware requirements to code-free device configuration.
What exactly is IR2MQTT and how does it work?
IR2MQTT is a lightweight, cloud-free solution that lets you control legacy IR devices through Home Assistant. It consists of a back-end service and a web interface. The back-end listens for MQTT messages and sends IR codes via an ESP32 or ESP8266 running ESPHome firmware. The web interface lets you add, configure, and test IR devices without writing any YAML or manually capturing codes. Instead, it taps into large online databases of pre-recorded IR codes, so you can often just search for your appliance model and get working commands instantly. The whole system stays local—no internet connection required for everyday use.
Why choose a cloudless IR controller over a cloud-based one?
Cloud-based IR controllers often frustrate users with mandatory internet connectivity, slow response times, privacy concerns, and potential service shutdowns. With IR2MQTT, everything runs on your local network. Commands are sent almost instantly via MQTT, and there’s no dependency on a remote server. This means your smart home keeps working even if your internet goes down. Moreover, you have full control over your data and can customize the system to your exact needs. The trade-off is a slightly higher initial setup effort, but once running, it’s reliable and fast—perfect for enthusiasts who value independence and performance.
What hardware do I need to get started with IR2MQTT?
The core hardware is an ESP32 or ESP8266 microcontroller equipped with an IR LED (and often a transistor to boost current). This board runs a custom firmware based on ESPHome, which handles IR signal transmission. You’ll also need a Home Assistant instance to act as the automation hub. That’s it—no cloud dongles, bridges, or subscription fees. For power and connectivity, a simple USB cable and Wi-Fi are sufficient. Many builders also add an IR receiver to capture codes from existing remotes, but it’s optional since IR2MQTT integrates with online code databases. The total cost can be under $10, making it a very affordable DIY project.
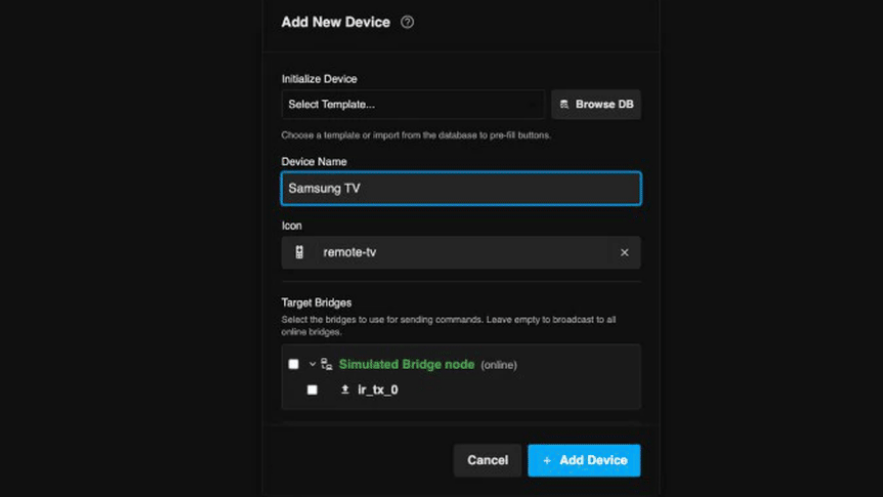
How do I set up IR devices without manually creating YAML files?
IR2MQTT’s web interface eliminates the need to write YAML by hand. After flashing your ESP32/ESP8266 with the ESPHome IR2MQTT firmware, you open the web UI. There, you can search for your device brand and model in a built-in database of over 100,000 IR codes. Select your appliance, and the corresponding commands (power, volume, temperature, etc.) are automatically loaded. You can also test each command directly from the web page to ensure it works. If a code isn’t in the database, you can capture it using an IR receiver and the learn function, but that’s rarely needed. Once configured, the settings are saved and immediately available in Home Assistant as MQTT entities.

How does IR2MQTT integrate with Home Assistant?
IR2MQTT communicates over the MQTT protocol, which Home Assistant natively supports. After you define your IR codes in the web interface, the back-end publishes them as MQTT topics and messages. In Home Assistant, you add an MQTT integration and then create switch, fan, or climate entities that subscribe to those topics. For example, you can create a “TV Power” switch that sends the power toggle IR code when turned on or off. The automation can be extended with Home Assistant’s powerful scripting, schedules, and sensors. The result is a seamless, cloud-free experience where your dumb IR appliances behave like smart devices, fully controllable from dashboards, voice assistants, or automations.
What are the key benefits compared to commercial IR blasters?
Commercial IR blasters often require subscriptions, phone home to cloud servers, and limit device configurations. IR2MQTT gives you full ownership: all data stays local, you can add unlimited devices, and you’re not locked into a proprietary ecosystem. The web interface is self-hosted and can be accessed from any browser on your network. The system is also extensible—you can modify the ESPHome firmware to add sensors (e.g., temperature) or combine multiple IR LEDs to cover different rooms. Because it’s built on open standards (MQTT, ESPHome, Home Assistant), you can integrate it with any compatible platform. Plus, the community actively updates the code database, so support for new appliances keeps growing.
What common issues might I encounter and how can I fix them?
Most problems stem from IR signal strength or incorrect codes. Make sure the IR LED is properly positioned within line-of-sight of your appliance (some reflective surfaces can help). If commands don’t work, try testing with the web interface first—if the device responds there, then the issue is likely in Home Assistant’s MQTT configuration. Double-check your MQTT broker setup and entity naming. For appliances not in the database, you can capture codes using an IR receiver and the learn function in the web UI. Another tip: some devices require multiple commands (e.g., hold for 2 seconds) – you can configure repeats in IR2MQTT. Finally, ensure your ESP32/ESP8266 firmware is up-to-date, as newer versions improve compatibility.